Why Performance Management
Why Request Feedback?
Why Continuous Performance Management?
Why have Frequent Conversations?
Why use Feedback Circles for 360 Feedback?
Why in the moment Feedback?
Why have Different Types of Conversations?
Why create Agile Performance Goals?
Employees
How-to Videos
Objectives
What are Objectives
Setting Personal Development Objectives
What are Personal Development Objectives
Setting Performance Objectives
Adding Collaborators to Objectives (Optional Feature)
Managing Your Objectives
Actions
Conversations
Microsoft Outlook Integration - Employee Configuration
Preparing for a Check-in
Making the most of Check Ins
Feedback
Giving Effective Feedback
How to Give and Receive Feedback
Feedback Circles (Optional Feature)
Feedback - Draft with AI FAQ's
Give Feedback from Microsoft Teams
Feedback - Giving Feedback using Voice Messaging
Frequently Asked Questions (FAQs)
How to answer your Talent Snapshot
Feedback - Draft your Feedback with AI
Managers
Your Team
Workflows for Multiple Managers
My Team - Private Notes
My Team - Performance Summary
My Team - Key features and functions
Manager: How to answer a Talent Snapshot for your Team
System Administrators
System Administrators
Admin How-to Videos
DEPRECATED Training and Communication Materials
DEPRECATED Admin System Configuration Options
DEPRECATED Integration Settings
OneAdvanced Identity
Understanding OneAdvanced Identity
Configuring authentication with a federated Identity Provider (SSO)
Federated Identity Provider (SSO) - Migration plan
Federating OneAdvanced Identity to Azure Active Directory
Frequently Asked Questions (for Federated customers)
Configuring authentication without a federated Identity Provider
Templated Colleague Communications: Moving to OneAdvanced Identity
Non-federated Identity Provider - Migration plan
Frequently Asked Questions (for non-Federated customers)
Logging-in with Multi-Factor Authentication (for non-SSO users)
Performance & Talent App Initiated Login - SSO
DEPRECATED Analytics (Additional Module)
Migration from Analytics API to Performance and Talent Reporting API
Analytics API End of Life Notification
DEPRECATED Engagement (Additional Module)
Performance & Talent Implementation
System Notifications- Admin System Configuration Options
Talent Snapshots
How to add new round in Talent snapshot
How to add or remove participant in Talent snapshots
How to add new round in Talent snapshot
Define what talent means in your organisation
Creating Effective Talent Snapshot Questions
How to create and edit a new Template for Talent snapshots
Languages and System Terminology Settings
Conversation Settings
Conversations - Reminders and Discussion Prompts
Supplemental Discussion Prompts
Enabling Multiple Conversation Types
Default Conversation Prompts
Organisational Goals
Navigation Options
Admin Reporting Overview
Objective Settings
Configuring the Objectives Library
Performance Objective Options
Personal Development Objective Options
Feedback Settings
Feedback Circles Round Templates
Draft with AI for Admins
Feedback Circles for Admins (Additional Module)
Feedback Settings
Building a Feedback Culture
Support is Evolving
People Management
Multiple Managers Configuration
How to Set Up Delegate Access
People Management
Creating Admin Roles / Assigning Access
Report Visibility Options
Integration Settings
User Experience / User Interface Release
Table of contents
- All categories
- System Administrators
- System Administrators
- DEPRECATED Admin System Configuration Options
- DEPRECATED Integration Settings
- OneAdvanced Identity
- Configuring authentication without a federated Identity Provider
- Logging-in with Multi-Factor Authentication (for non-SSO users)
Logging-in with Multi-Factor Authentication (for non-SSO users)
What’s changing?
As an additional security measure, OneAdvanced Identity requires Multi-Factor Authentication (MFA) alongside email and password authentication. After migration, users will need to provide a second form of verification, which can be done via email or using your preferred authenticator app. You can also take advantage of EasyPass to provide your users the option of logging in with biometrics registered on their personal devices. See our EasyPass guide for more information.
Logging in for the first time
If designated as the Administrator for the system, an email invitation to create a new account and password will not be automatically received. In this case, the password reset process, as described for users who miss the 2-day deadline, will need to be followed.
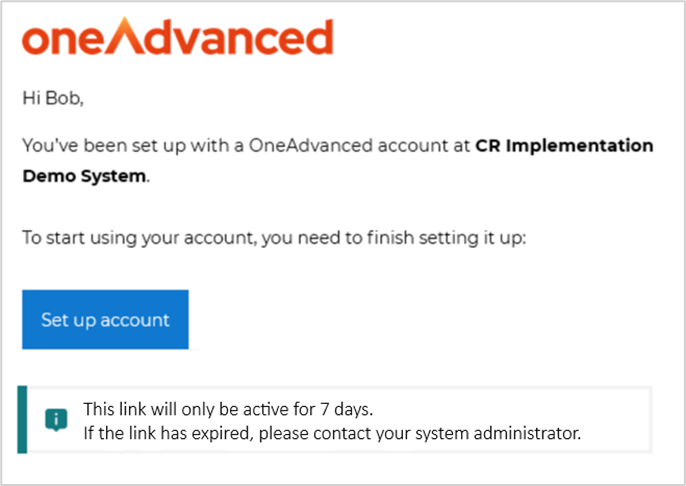
- Upon migration, users can expect to receive an email from identity@oneadvanced.com, which will contain the following information:
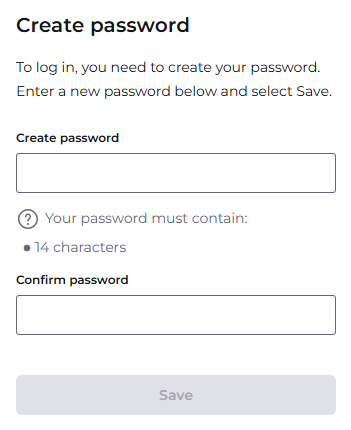
- Upon clicking the 'Set up account' link, the following page will be displayed, where a new password (different from the current one) must be set.
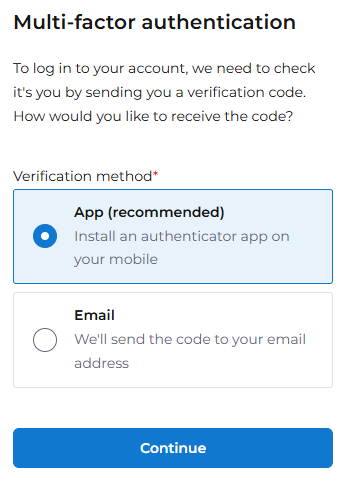
- After saving the chosen password, options for Multi-Factor Authentication (MFA) will be presented.
Using an authenticator app
An MFA (Multi-Factor Authentication) authenticator app is a software application that generates a time-sensitive code to verify a user's identity, adding an extra layer of security to online accounts. Some of the top authenticator apps available include Google Authenticator, Microsoft Authenticator, and Authy, which are widely used for their ease of use and robust security features.
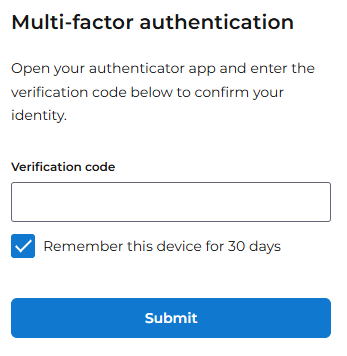
- If the authenticator app option is selected, the next page will display a unique QR code for scanning to set up authentication on the device.
- The verification code generated by the authenticator app can then be entered in the provided field and verified.
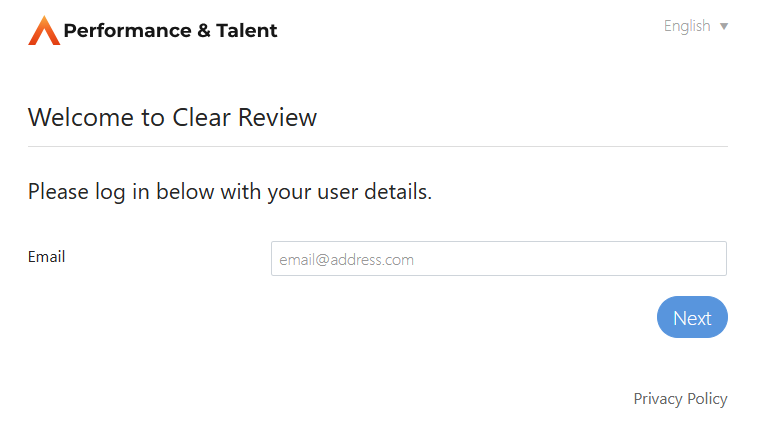
- After verification, the user will be redirected to the Performance & Talent log-in screen, where their email address can be entered.

- After entering the email address and clicking Next, the password can be entered, followed by the verification code generated by the authenticator app on the subsequent screen
- Upon clicking Submit, access to Performance & Talent will be granted.
Using email to verify
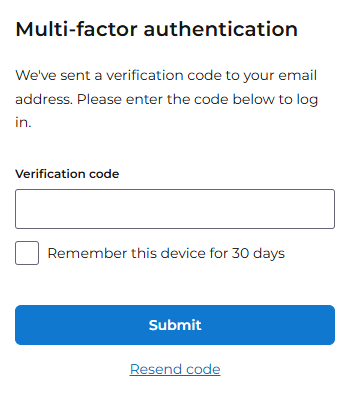
- If the option to receive a verification code via email is selected, a code will be sent to verify the email address.
- The unique verification code can then be entered in the provided field and verified.
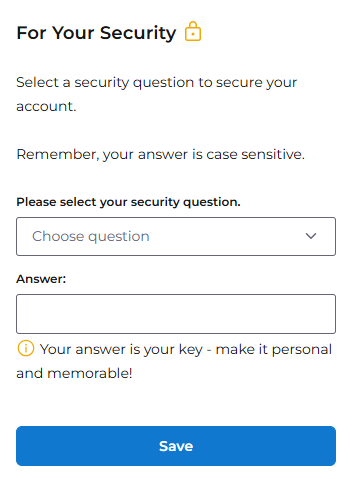
- A security question and answer will be required for account recovery purposes.
- After saving the account details, the user will be redirected to the Performance & Talent log-in screen.
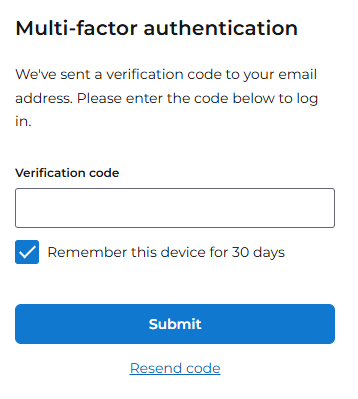
- After entering the email address and clicking Next, the password can be entered, followed by a request for a verification code on the subsequent screen
- A unique verification code will be sent to the registered email address. The code must be submitted to complete the sign-in process.
Users who have missed the 2-day expiration period of the email link
- If the account is not activated within the 2-day deadline, clicking the 'set up account' link in the email will display the following message

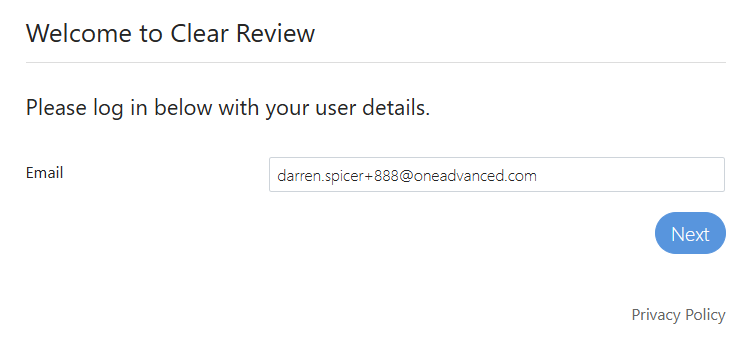
- Upon reaching the log-in screen, enter the registered email address and select 'Next'.
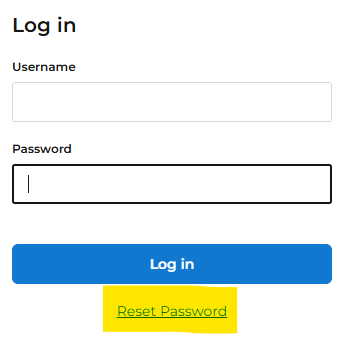
- Select 'Reset Password'
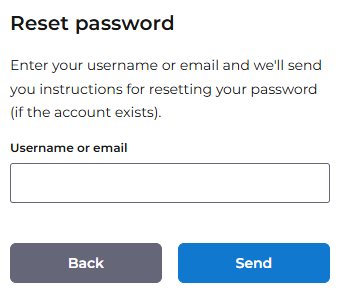
- Enter the registered email address and select 'Send'.
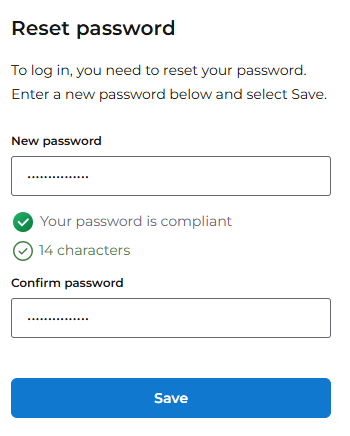
- An email with a reset link will be received, directing to a screen where a new password can be chosen and saved.
- The next step will be to select an authentication method, following the same process as previously described. Once the authentication preferences are set, the remaining steps can be completed as outlined earlier.